
How to Automate Blog Draft Writing with Make.com and Perplexity (Part 4/13)

If you already have a Make.com scenario that pulls SEO keywords from Google Sheets, the next logical step is simple: let AI turn those keywords into a draft article for you.
That is exactly what this setup does. In this guide, I’ll walk through how to connect Perplexity to Make.com, how to structure the prompts, and how to test the draft-writing module before sending anything to WordPress.
The goal is not to publish perfect articles with one click and disappear forever. The goal is to save time on research and first drafts, especially if you are a marketer, freelancer, or business owner who would rather not manually create every post from scratch.
Table of Contents
- Step 1: Understand where this module fits in the automation
- Step 2: Decide why you want to use Perplexity for the writing step
- Step 3: Add the Perplexity module in Make.com
- Step 4: Generate your Perplexity API key
- Step 5: Choose a model that fits simple content research
- Step 6: Build a strong system prompt
- Step 7: Build the user prompt with live data from Google Sheets
- Step 8: Map your spreadsheet fields into the prompt
- Step 9: Rename the module and test it properly
- Step 10: Check the output inside Make.com
- Step 11: Tune the prompt until the drafts feel right
- Step 12: Treat the result as a draft, not a finished article
- Step 13: See the progress you have already made in the full scenario
- Practical tips before you automate article writing at scale
- Summary
Step 1: Understand where this module fits in the automation
This article covers one specific part of a larger content workflow: the draft-writing step.
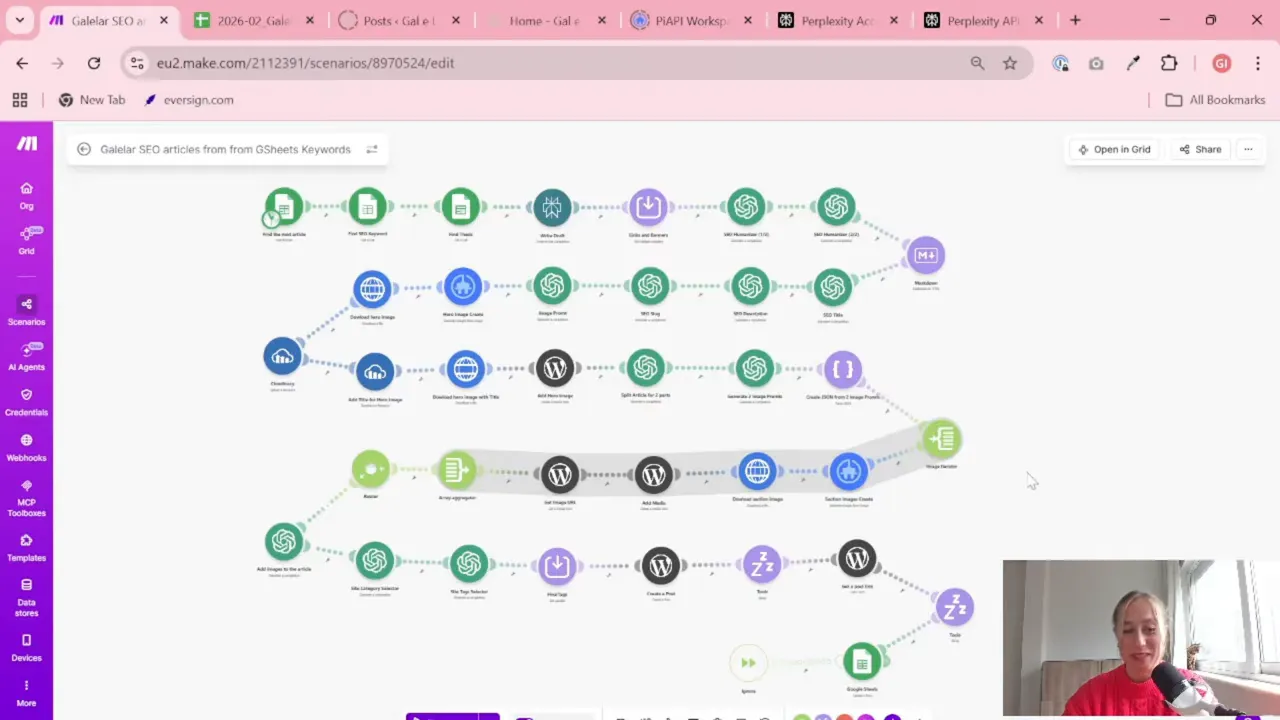
The broader scenario looks like this:
- You keep a list of SEO keywords and article ideas in Google Sheets.
- Make.com reads a row from that sheet.
- Perplexity researches the topic and writes a draft.
- Later steps can prepare and publish that content to WordPress.
So if you are thinking, “Why not just type directly into WordPress?” — yes, you could. But if you have many topics to cover, or you are building a repeatable content process, automation starts to make a lot of sense.
This is especially useful if you already like working from spreadsheets. Google Sheets becomes your content queue, and Make becomes the bridge between your planning and your publishing.
If you want to get more comfortable with Google Sheets-based workflows before building automations like this, this guide on connecting and using Looker Studio with Google Sheets is a helpful starting point.
Step 2: Decide why you want to use Perplexity for the writing step
There are many AI tools that can generate text. In this workflow, Perplexity is used because it is strong at research.
That matters. For many blog articles, the hard part is not only writing the words. It is:
- understanding the topic quickly,
- organizing the article structure,
- keeping the draft aligned with the keyword,
- and getting a useful first version you can improve later.
In other words, this setup is not asking AI to “write anything.” It is asking AI to research a specific topic and create a draft article based on clear instructions.
That is a much better use case.
The automation tool I use for this setup
For automation, one of my favorite tools is Make.com. I use it to connect different tools and automate repetitive workflows — for example moving data between APIs, Google Sheets, and reporting systems.
Perplexity also has an API, which means you can connect it to Make.com and run it inside an automation. And that is the nice part here: you do not need to write code. Make gives you a visual interface, so the process feels more like building blocks than software development.
Step 3: Add the Perplexity module in Make.com
Inside your Make scenario, add a new module after your Google Sheets step.
In this case, the Google Sheets module is already bringing in the data you need, such as:
- the primary keyword,
- and the article thesis or topic angle.
Now you add Perplexity as the next module. The useful option here is the one for creating a chat completion.
When you connect it for the first time, Make will ask you to create a new connection.
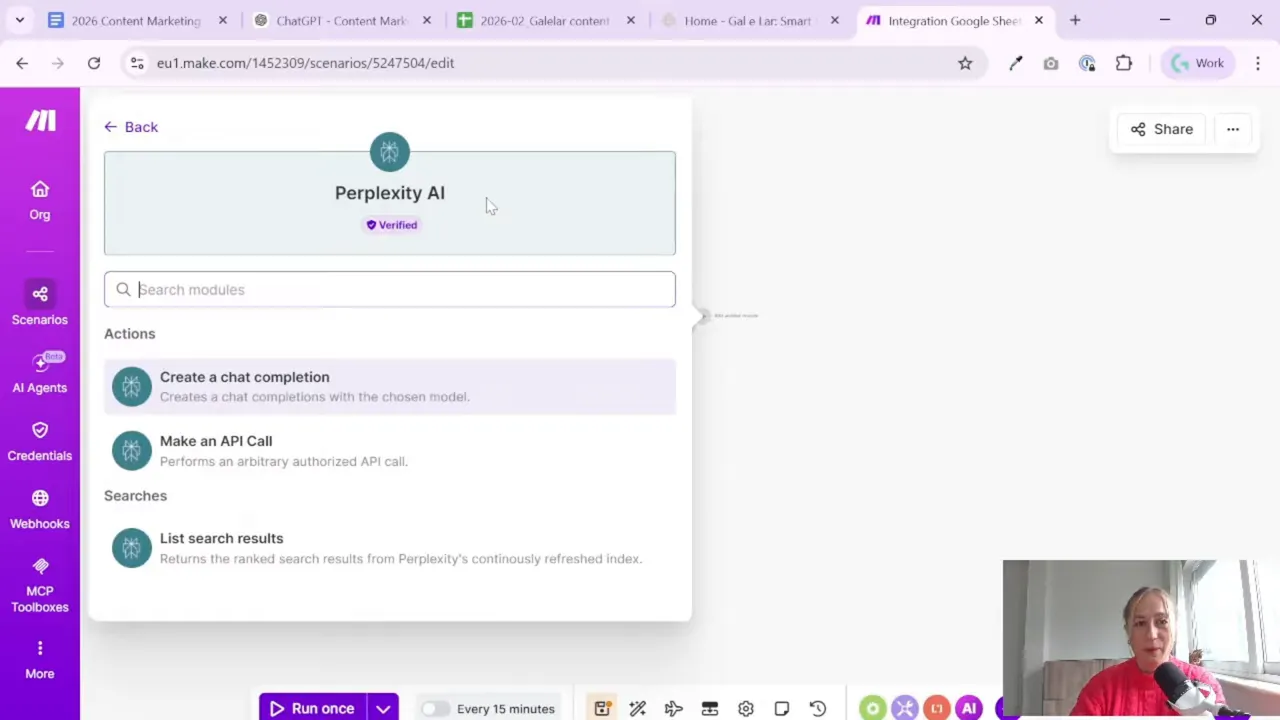
You will need two basic things:
- a name for the connection,
- and a Perplexity API key.
The connection name can be anything practical. Usually, I recommend naming it in a way that makes future maintenance less annoying. “Perplexity test,” “Perplexity content,” or something similar is perfectly fine.
Step 4: Generate your Perplexity API key
This is the step that usually makes non-technical users pause for a second. “API key” sounds scary, but in practice it is just a credential that lets Make talk to Perplexity on your behalf.
Here is the simple version of the process:
- Log in to your Perplexity account.
- Go to your account settings.
- Open the API platform area.
- Go to API keys.
- Generate a new key.
- Copy it.
- Paste it into your Make connection.
Then save the connection.
One important note: using the API is not the same as using the normal web interface. You need credits in your Perplexity account to run requests through the API. In the example workflow, adding a small amount of credit is enough to get started.
So yes, there is a tiny setup cost. But if this saves you hours of manual drafting, it is usually worth it pretty quickly.
Step 5: Choose a model that fits simple content research
Once the connection is ready, you need to choose the model inside the Perplexity module.
For this workflow, the chosen model is Sonar. The reason is practical: it works well for general research and article drafting without overcomplicating the process.
There is also a deeper research option, which may make sense for more complex topics. But if your content is about everyday business, marketing, productivity, lifestyle, or similar themes, a simpler research model can be enough.
That is a good reminder for AI content workflows in general: you do not always need the fanciest setup. Sometimes the best workflow is the one that is easy to maintain and gives consistent output.
Step 6: Build a strong system prompt
This is where the quality of your article draft is really shaped.
The setup uses two layers of prompting:
- System prompt: your overall instructions and writing role.
- User prompt: the specific article context pulled from Google Sheets.
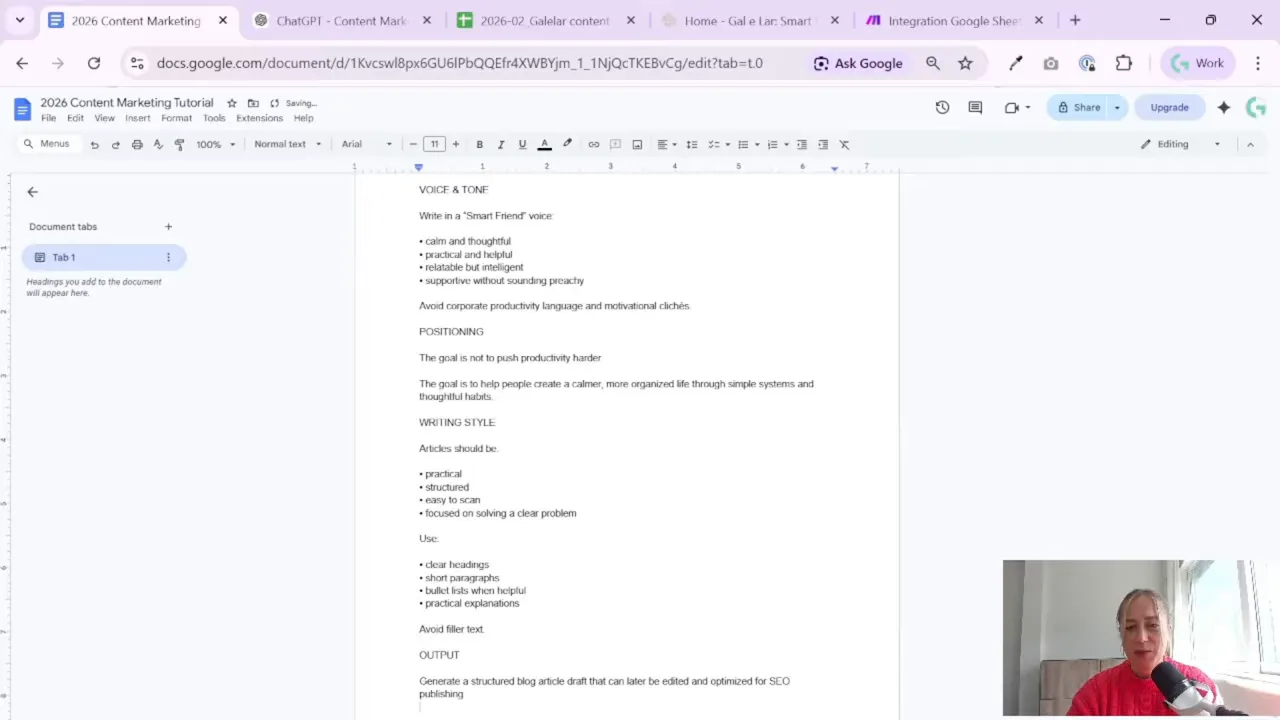
The system prompt is the “big picture” instruction. It tells Perplexity what kind of writer it should act like and what kind of content you want.
For example, the system prompt can include things like:
- the role of the assistant, such as senior content strategist, researcher, and writer,
- the niche or topic area,
- the target audience,
- the tone of voice,
- the writing style,
- and the desired output format.
This part matters because style is not universal. A blog for founders sounds different from a blog for students. A practical SEO article sounds different from a personal essay. If you want useful drafts, tell the tool who it is writing for and how it should sound.
That does not need to be fancy. Clear is better than fancy.
What a good system prompt should cover
At minimum, include these elements:
- Audience: Who is the article for?
- Tone: Friendly, practical, thoughtful, direct, etc.
- Positioning: What perspective should the article take?
- Structure: Ask for a structured blog draft, not a random wall of text.
- Purpose: Research first, then draft.
If the first output feels too generic, the system prompt is one of the first places to improve.
Step 7: Build the user prompt with live data from Google Sheets
The user prompt adds the article-specific context.
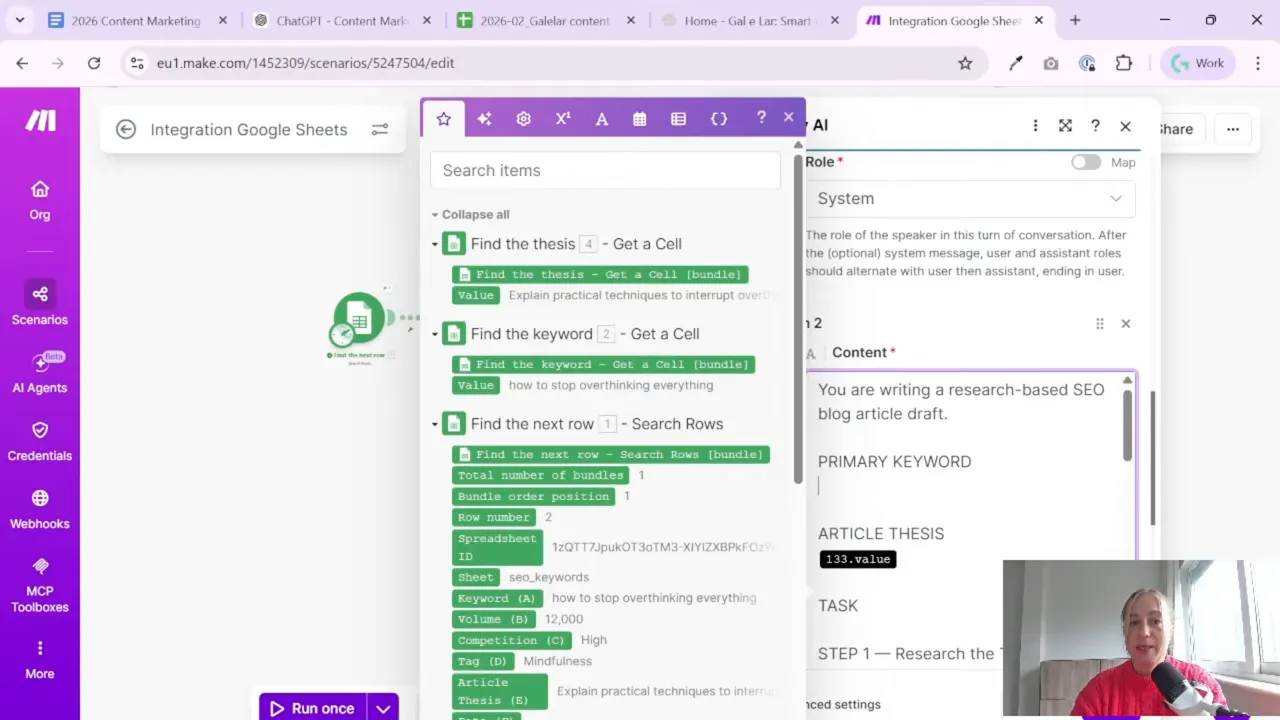
This is where you take dynamic values from the previous Google Sheets module and pass them into Perplexity. In this setup, the most important values are:
- the primary keyword,
- and the article thesis.
Then you add direct instructions for what the draft should do.
Typical elements in the user prompt include:
- research the topic based on the keyword,
- follow a clear article structure,
- respect SEO rules,
- place the keyword naturally,
- aim for a target article length,
- and write in the required language.
This is a smart setup because your prompt stays reusable. You do not need to rewrite it every time. You build the logic once, and then your spreadsheet supplies the topic each time the scenario runs.
That is really the heart of marketing automation: one setup, many repeatable outputs.
Step 8: Map your spreadsheet fields into the prompt
Inside Make.com, mapping lets you pull values from one module into another. In this case, you take the keyword and thesis from the Google Sheets step and insert them into the Perplexity user prompt.
That means every row in your spreadsheet can become a different article draft.
A simple sheet might contain columns like:
- Primary keyword
- Article thesis
- Status
Then Make reads a row, Perplexity writes the draft, and later steps can update the row status or send the content onward.
If you already use Google Sheets as your lightweight operations center for marketing tasks, this kind of setup will feel natural. It is one of the easiest ways to manage content planning without needing a complicated CMS workflow from day one.
For more practical tutorials and simple data workflows, the Gaille Reports blog has several useful guides in a similar style.
Step 9: Rename the module and test it properly
Before running the full scenario, rename the module to something clear, such as Write draft.
This sounds minor, but once your automation grows, readable module names save a lot of confusion. “Module 7” is not very helpful three weeks later.
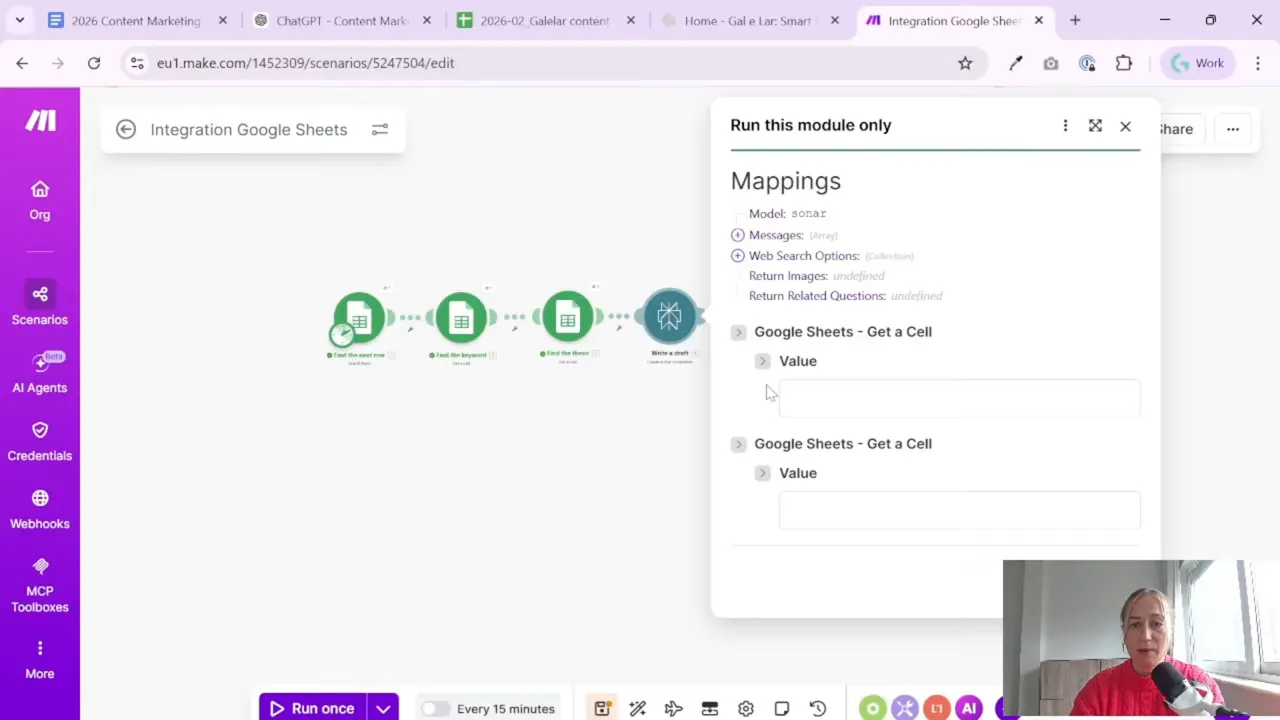
Then test only this step first.
In Make, you can right-click and run the module on its own. That is usually better than launching the whole scenario immediately, especially while your prompts are still being adjusted.
Why? Because when you test only one module, you can focus on one problem at a time:
- Did the keyword map correctly?
- Did the thesis come through?
- Did Perplexity return a structured draft?
- Is the style usable?
This kind of step-by-step testing is boring in the best possible way. It prevents messy troubleshooting later.
Step 10: Check the output inside Make.com
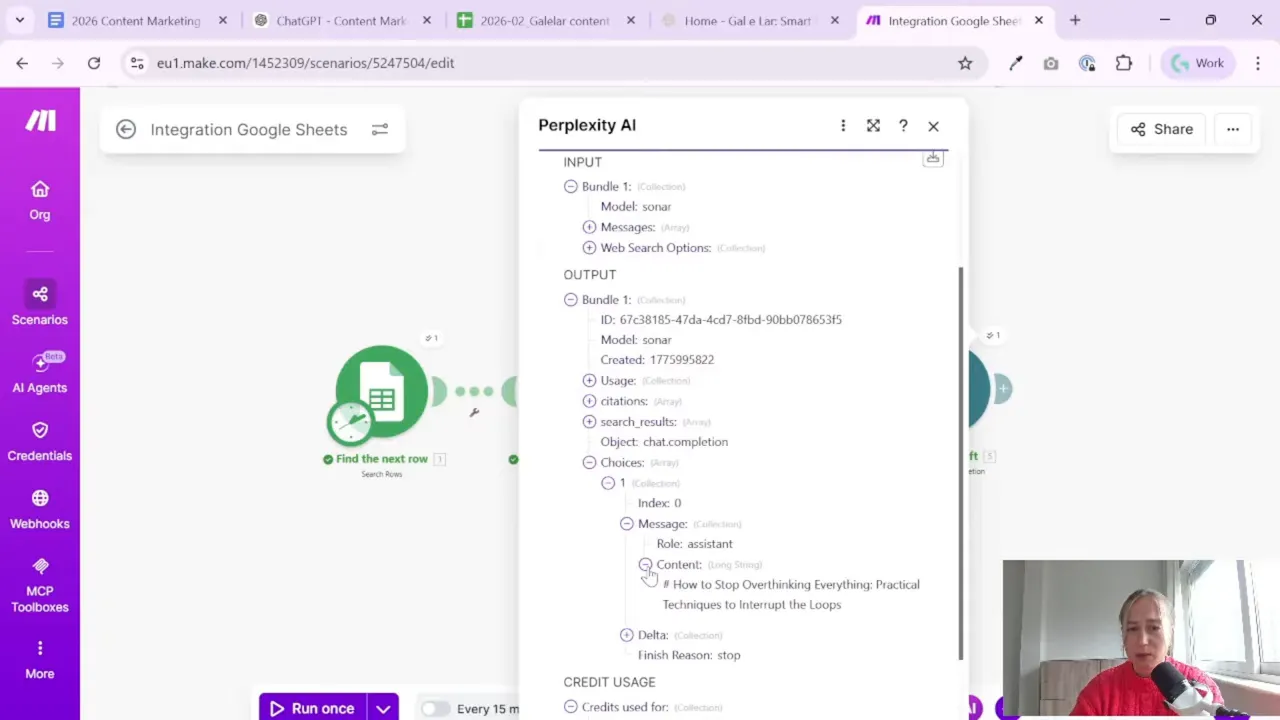
After the module runs, open the output bundle and inspect the response.
In this setup, the article draft appears inside the returned message content. That is where you can read what Perplexity produced and decide whether the prompt is doing its job.
You are not only checking if text appeared. You are checking if the text is useful.
Look at things like:
- Does the topic match the keyword?
- Does the structure make sense?
- Does the tone fit your brand or site?
- Is the article too generic?
- Did it follow the intended language and length?
This is the stage where many people expect magic. Usually, what you get instead is a draft that is somewhere between “not bad” and “okay, we need to fix a few things.”
That is normal.
Step 11: Tune the prompt until the drafts feel right
This is probably the most useful part of the whole process.
Once you see the output, do not assume the first result is final. Prompt tuning is part of the workflow.
If the article does not work for your niche, go back and adjust:
- the audience description,
- the tone of voice,
- the article structure instructions,
- the SEO guidance,
- or the level of detail in the thesis.
You can even use other AI tools to help improve your prompt. For example, you might ask an assistant to help rewrite your instructions for better Perplexity output. That is completely reasonable.
Sometimes the easiest way to improve AI writing is not to ask for better writing directly, but to ask for a better prompt.
A practical way to tune your setup is:
- Run one article draft.
- Read it critically.
- Note what is weak.
- Update the prompt.
- Test again.
Repeat this until the draft feels good enough to become part of your normal workflow.
You do not need perfection. You need a reliable first draft that saves time.
Step 12: Treat the result as a draft, not a finished article
This automation creates a draft article. That is the right mindset.
A draft is meant to help you move faster. It does not replace judgment, editing, or your own expertise.
Even if the output is strong, it is still smart to review:
- facts and claims,
- brand tone,
- SEO wording,
- examples,
- and overall flow.
If you are publishing on a business website, this matters even more. AI can save time on preparation, but you still want the final article to sound like it belongs on your site.
That is why this workflow is so practical: it automates the repetitive part without pretending humans are unnecessary.
Step 13: See the progress you have already made in the full scenario
By this point, the automation already covers some very useful steps:
- You decided to create articles automatically.
- You prepared a Google Sheets table with SEO keywords.
- You connected that sheet to Make.com.
- You connected Perplexity through the API.
- You generated a draft article based on keyword and thesis inputs.
That is already a solid content engine.
The remaining steps in a larger workflow would typically involve formatting, review, and eventually posting to WordPress. But even on its own, this draft-writing stage is valuable because it removes a lot of manual effort from content production.
If you enjoy systems that save time and reduce repetitive marketing work, you might also like exploring ready-made reporting setups such as these Looker Studio templates for marketing and sales. Different use case, same idea: less busywork, more useful output.
Practical tips before you automate article writing at scale
Before you create dozens of drafts, keep these simple tips in mind:
- Start small. Test with a few keywords first.
- Keep your sheet clean. Bad inputs usually lead to bad drafts.
- Name modules clearly. Future-you will be grateful.
- Review outputs manually. Especially while refining prompts.
- Use AI for the heavy lifting, not for blind publishing.
Also, if your niche is very specialized, expect to spend more time on prompt tuning. That is not a sign the workflow is failing. It just means your content needs more direction.
Summary
Connecting Perplexity to Make.com is a practical way to automate content research and first-draft writing without coding. You take keywords and article ideas from Google Sheets, pass them into a structured prompt, let Perplexity create a draft, and then review the result before moving toward publication.
The biggest lesson here is simple: the automation is only as good as the prompt and the inputs. Set up the connection correctly, give the AI clear instructions, test the output carefully, and improve the prompt until the drafts are actually useful.
Once that part is working, you are no longer starting every article from a blank page. And honestly, that is already a very nice upgrade.
Want to go further with your data and automation setup?

Tool I use for automation
For automation, one of my favorite tools is Make.com.
I use it to connect different tools and automate repetitive workflows — for example moving data between APIs, Google Sheets, and reporting systems.
Tool for turning videos into articles
If you create video content and want to turn it into written articles faster, you might find VideoToBlog interesting.
It can take a video and generate a blog draft that you can edit and publish on your site.